If you want a shorter but vaguer guide using Audacity, use Slashy's
here. If you want clear, precise instructions on getting your loops perfect, use mine. But remember:
no guide is going to magically enable you to make perfect loops with no effort. Getting perfect loops requires more than a good guide; it requires work, a good ear, and lots of patience.
FAQPlease read this before asking any questions. It has solutions to several common problems that are asked about far too much (hence
Frequently
Asked
Questions).
This update makes the entire guide much more concise.
The guide's instructions include color coding for various important elements. The key is as follows:
Green is for keyboard commands.
Yellow is for menu commands.
Teal is for attributes and other important things.
Video Tutorial
| <a href="http://www.youtube.com/watch?v=fmnUdMTpvfc" target="_blank" class="aeva_link bbc_link new_win">http://www.youtube.com/watch?v=fmnUdMTpvfc</a> |
This will be easier to follow if you at least attempt reading the guide first, or, ideally, read along with it.
GuideTable of ContentsUse Ctrl+F and the codes in parentheses to jump to a section.
1. Needed Tools (#tools)
2. Getting Started (#start)
-- Setting up Androu's tool (#setup)
-- A base brstm (#base)
3. Making a Song (#song)
-- Regular Loop or Custom Loop? (#loop)
-- Editing (#edit)
--- Extra Instructions for Custom Looping (#custom)
---- The 14336 Rule (#14336)
-- Converting (#convert)
--- Stereo or Mono? (#type)
--- Creating Your brstm (#brstm)
---- Mono (#mono)
---- Stereo (#stereo)
4. Making a Victory Theme (#victory)
-- Mono (#vmono)
-- Stereo (#vstereo)
5. Testing Your Song in BrawlBox (#test)
-- Playing a song (#play)
6. Changing Music Titles (#titles)
7. Adding Your Files to Brawl (#brawl)
-- SD Loader (#dsdl)
-- ISO modification (#isomod)
1. Needed Tools: (#tools)
--
Androu1's BRSTM Maker and BRSTM2SD-- Goldwave (trial version
here, full version
here)
--
MP3Gain for checking song volume
-- BRSTM2SD (another program by Androu1; it is included with the latest version of the music tool)
--
Brawl Track List (so you know what you're replacing; not necesary if using BRSTM2SD)
--
Brawlbox for changing music titles and playing finished brstms
If adding your music to the ISO:-- An SSBB ISO (
Make your own or
download it)
--
WiiScrubber 1.21 (Note that the key.bin required to make it work will have to be obtained elsewhere; Google it or, if necessary, PM me.)
--
USB Loader GX or blank DVDs, a good DVD burner, the burning program of your choice (
ImgBurn is by far the easiest), and
a backup launcher-------------------------------
2. Getting Started (#start)
Welcome to the world of music hacking! I'm Professor Vyse.
Erhem. Glad to have you; it's always nice to see what other people will bring to the table. To that end, I'll provide you with everything you need to know in order to make your own custom brawling music. You're taking another big step towards
becoming a Pokemon master making your personal, individual copy of Brawl.
-- Setting up Androu's tool (#setup)
Before I continue, I'll address a question I still hear far too often: why use Androu's tool instead of BCSM or BrawlBox? The answer: volume. Both BCSM and BrawlBox attempt to normalize the volume of new brstms to match that of Brawl's default songs, and the results are spotty at best. Androu's tool allows you complete control of your song, including its volume. That does make it easier to make a mistake, but it also ensures that your song will be perfect once you know what you're doing. And that's what this guide is for!
Now, then. Once you've downloaded the rar from the link provided in Needed Tools, make a new folder at the root of your hard drive (where Program Files and the like are). Give it a name with
NO SPACES. Extract the brstm tool into this folder.
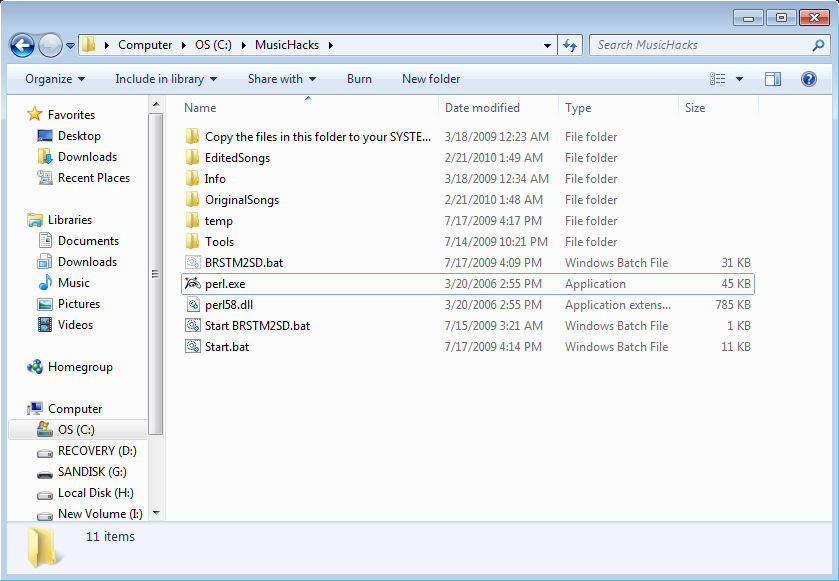
You will see a folder with the name "Copy the files in this folder to your SYSTEM folder." These files should go into C:\Windows\System32.
Create a folder named EditedSongs in the root of the music tool. This is how it should look when it's ready:
 -- A base brstm
 (#base)
The tool requires one brstm in the OriginalSongs folder in order to function. As far as I know, any brstm (and there are plenty available in this forum) will work, but for your convenience, the current download in #tools already includes one.
Once you have this in the OriginalSongs folder, you are ready start your own grand adventure in the world of
Pokemon music hacking.
-------------------------------
3. Making a Song (#song)
-- Regular loop or custom loop? (#loop)
Before you start editing your song, you need to decide something.
All brstms, except some victory themes, should loop. The decision: do you want to make a regular loop or a custom loop?
A regular loop starts over at the beginning of the song once it reaches the end. They’re much easier to make than custom loops, because you avoid the 14336 rule, but it’s much more difficult to make them sound as smooth and seamless as custom loops – without cutting away chunks of the song.
A custom loop plays through the entire song once and, once it reaches the end, restarts somewhere in the middle. It requires more effort, but if you follow this guide and develop a good ear, you’ll almost always create a better brstm than you would have using a regular loop.
-- Editing (#edit)
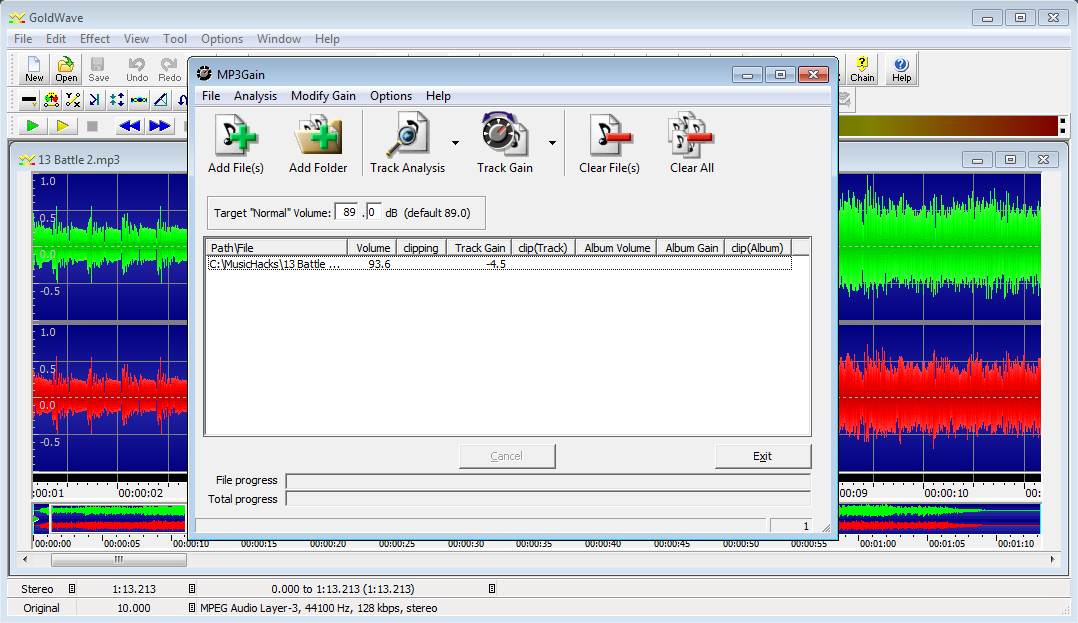
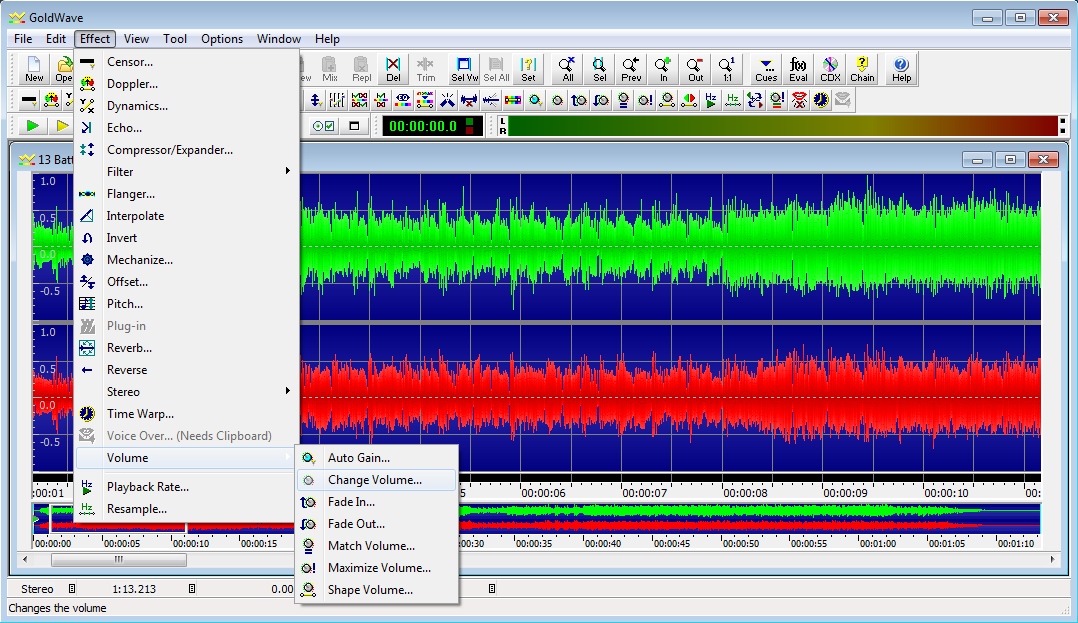
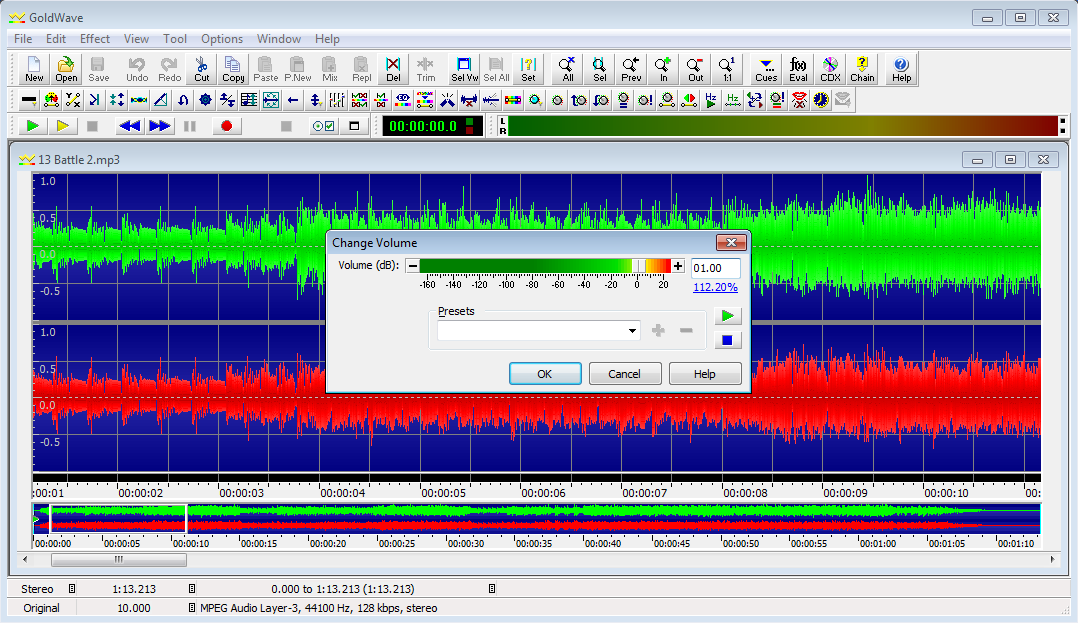
Open your song in GoldWave. If it’s not in mp3 format already, save it as one. You might want to close the version you just saved and open the original again to preserve the quality. Open the mp3 in MP3Gain and analyze it. If the volume is lower than the
93-95 decibel range, go to
Effect > Volume >Change Volume in GoldWave, type in the appropriate number to get it there, and press OK. Close MP3Gain.
->
->
->
Press
Shift+3 to switch to a 10-second view of your song. If you see any silence – empty space – at the start of your song, right-click where it ends and click
Set Finish Marker. Press
Delete to remove it.
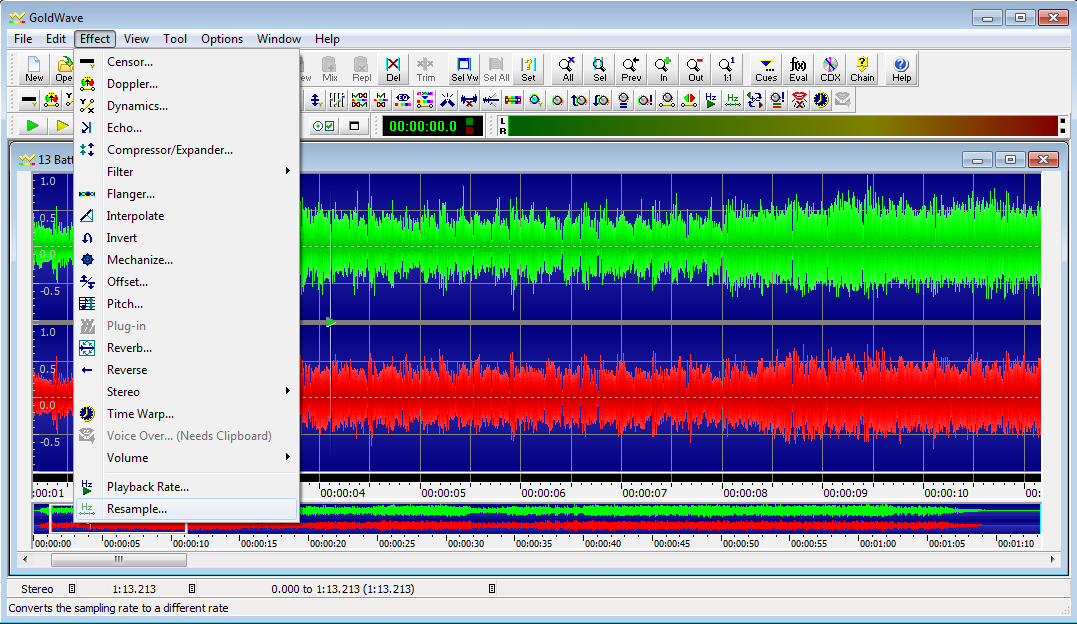
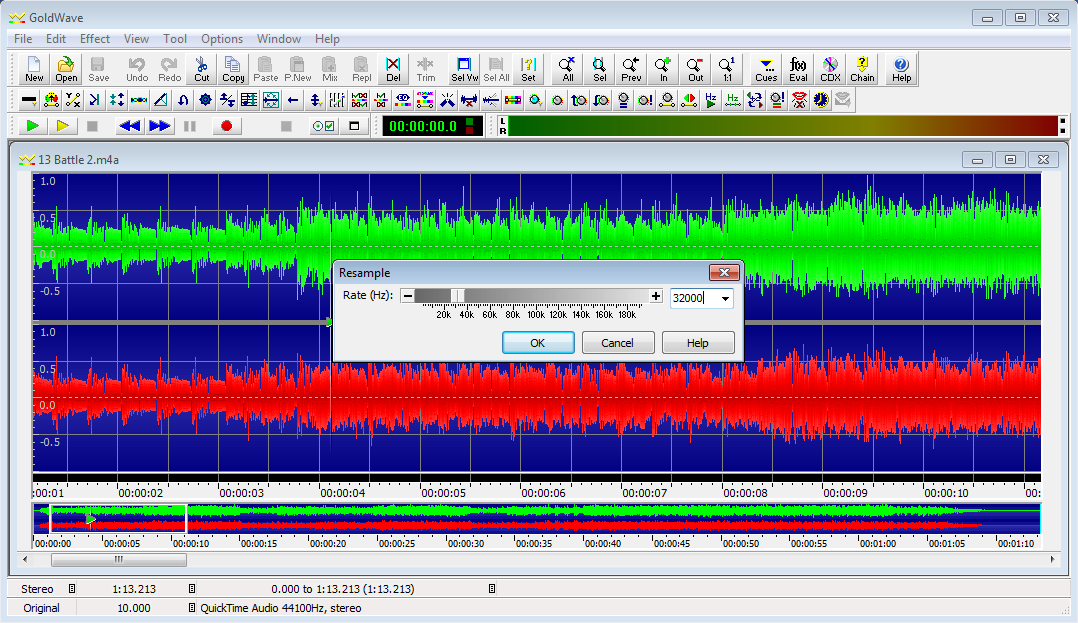
If you want to do all you can to make sure your song won’t glitch when used with the SD Loader, click
Effect > Resample and choose
32000 from the drop-down box.
->
If you chose to make a regular loop, there’s nothing else you have to do in this section. However, you can edit many songs, especially those from video games, such that the end flows smoothly into the beginning, creating a clean loop. If you’re interested in that, reading the following section until you reach the 14336 rule will help you. Otherwise, skip to the Converting section.
--- Extra Instructions for Custom Looping (#custom)
If you’re still reading, that means you’re either doing a custom loop or making a decent-sounding regular loop. Things get a bit trickier from here.
The first step is finding your loop points. These are two points within the song that sound similar enough that you can jump between them without any noticeable skipping or abrupt tempo changes. With video game music, which is usually made to loop, this is easy; with remixes or commercials songs -- not so much.
The best way to do this is to play the song. Get a feel for it, and listen for similar parts. As you gain more experience with GoldWave, you may find shortcuts here by noticing similar patterns in the waveform and playing only at those spots, but it’s never a bad idea to listen to the music you’re working with.
Once you’ve found some likely loop points, make sure you’re in 10-second view (
Shift+3) and look at them more closely. Switch between them frequently (right-clicking on the spots and dropping a cue point will help you remember where they are) and try to spot places where the two waveforms are exactly alike or at least very similar. My video has an excellent example of this.
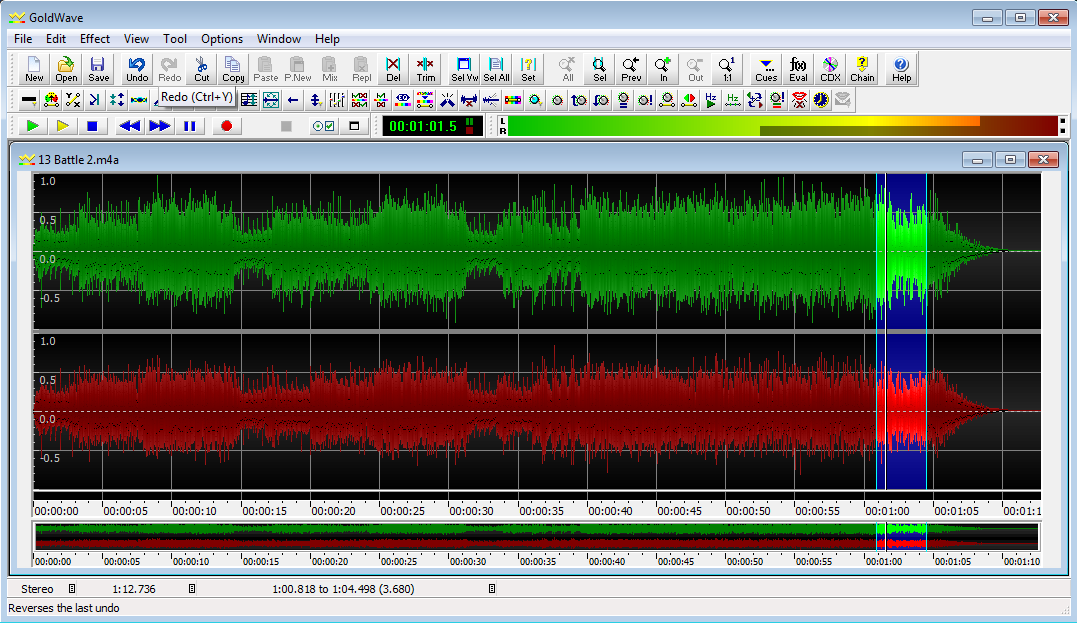
When you think you’ve found them, left-click on the earlier one to set your start point there and right-click to set your finish point at the later one. Now press the
yellow Play button (or
Shift+F4). Your song should start playing from the start point you just set. Press
Shift+E, click
Sample based position, and copy the number in
Start, then close the dialog box. Move to your end point and left-click somewhere in the song before it. Playback should jump there. Now press
Shift+E again, paste the number you copied back into
Start, and click OK. Playback should continue to your set end point then loop back to your start point. (If you're not quick enough on the draw, playback will loop to the most recent location of the start point, but it'll work the next time it reaches the end.)

->
->
How did it sound? If you weren’t looking at the screen, would you know that the song had jumped to a different point? If so, tweak the location of your start and/or end points and repeat the steps of the previous paragraph until it sounds right.
Once you’ve done this, you’ve finished the hardest part of making a good brstm.
If you’re making a regular loop, make sure your start and end points are where you want your loop to be, then press
Ctrl+T. This will cut off the rest of the song, since you aren’t using it. Now skip to the Converting section.
If you’re making a custom loop, there’s one more hurdle to clear: the 14336 rule.
----
The 14336 Rule (#14336)
Remember that number in
Start when you pressed
Shift+E? Put simply, the 14336 rule states that if that number is not a multiple of
14336, then the song will skip at the loop point when played in Brawl, regardless of how smooth it sounds on your computer.
Does choosing from a limited pool of possible start points and trying to find a matching end point sound like a hassle? A huge headache that you don’t want to deal with? It should, because it is – but that’s not what we’re going to do.
Instead, we’re going to turn the loop point you already found into a multiple of 14336 by adding silence to the beginning of the song.
If you’re thinking about making any objections, consider this: the standard sampling rate is 44,100 Hz; Brawl’s standard is 32,000 Hz. That means each second consists of 44,100 or 32,000 samples respectively. You will be adding, at most, 14335 samples of silence to the very beginning of your song. That’s less than one-third or less than one-half of a second, depending on your sampling rate: completely negligible.
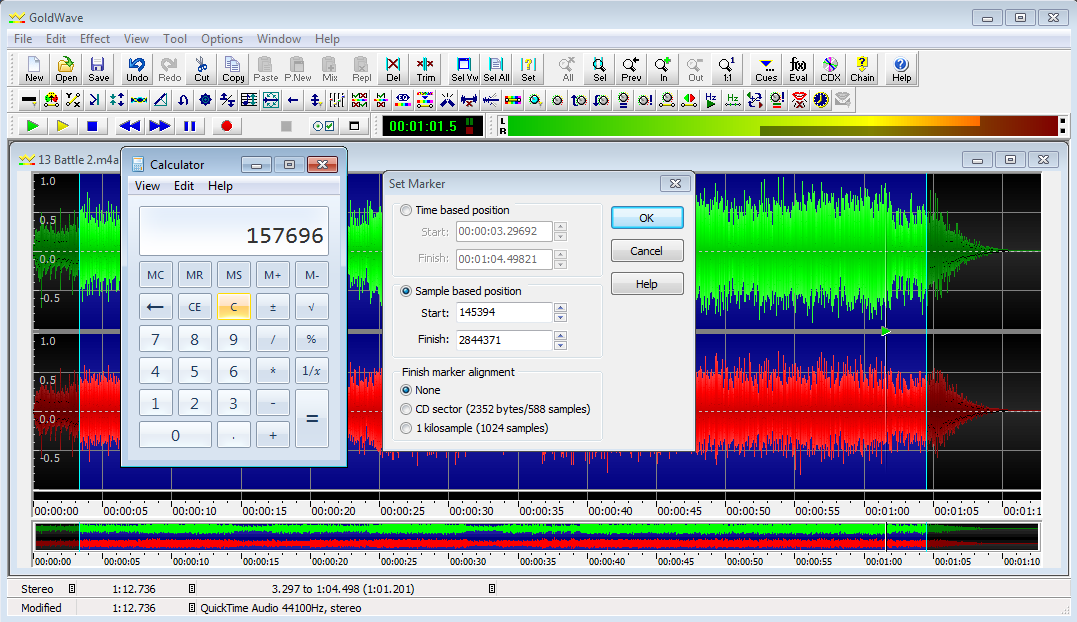
First, make sure your start and end points are where you want your loop to be. Press
Shift+E. Open two instances of Windows Calculator. In one of them, type 14336, press
+, then start pressing
= until you reach the first number greater than the number in
Start in GoldWave. Copy this number to the second calculator (Notepad works too, but this is easier.) Copy the number in
Start, go to the first calculator, press
-, paste in the number, and press
=. The result is the number of samples of silence you’ll be adding to your song.
->
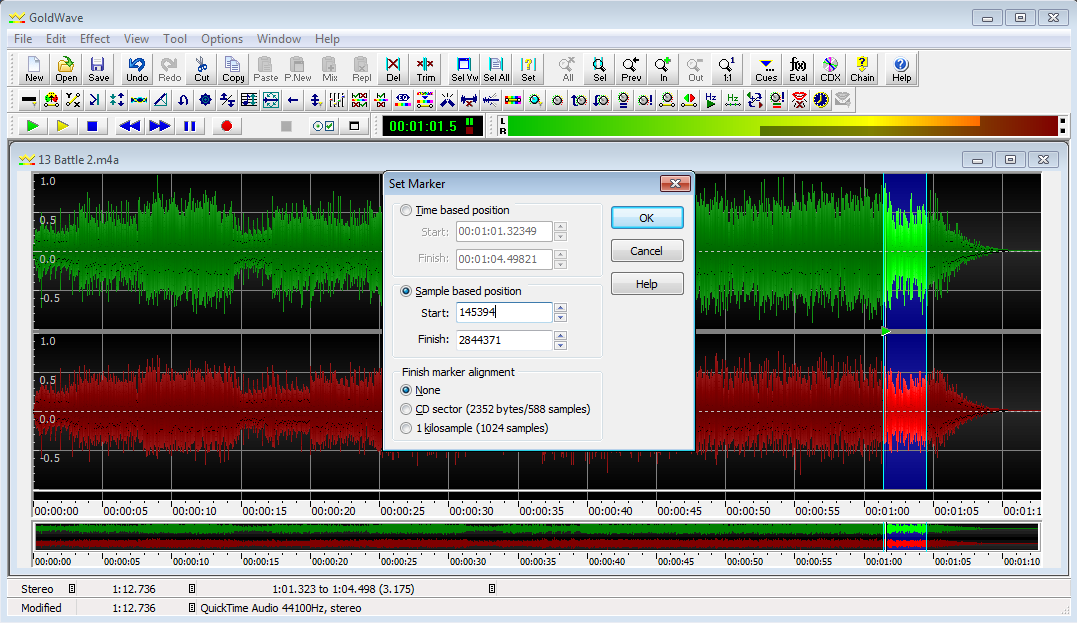
Back in GoldWave, copy the number in
Finish and paste it into
Start. Click on
Finish again, and insert a 1 before the first digit. Press
Enter. You should get a warning that the value has been adjusted. Press
Enter two more times, then press
Delete. You’ve just removed everything after your song’s ending loop point.
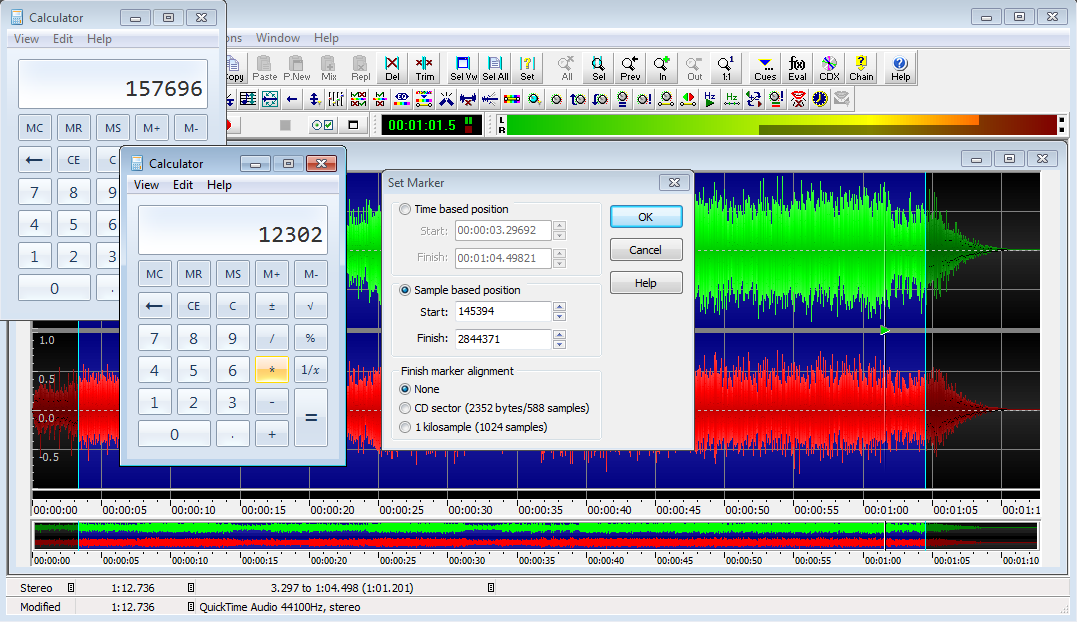
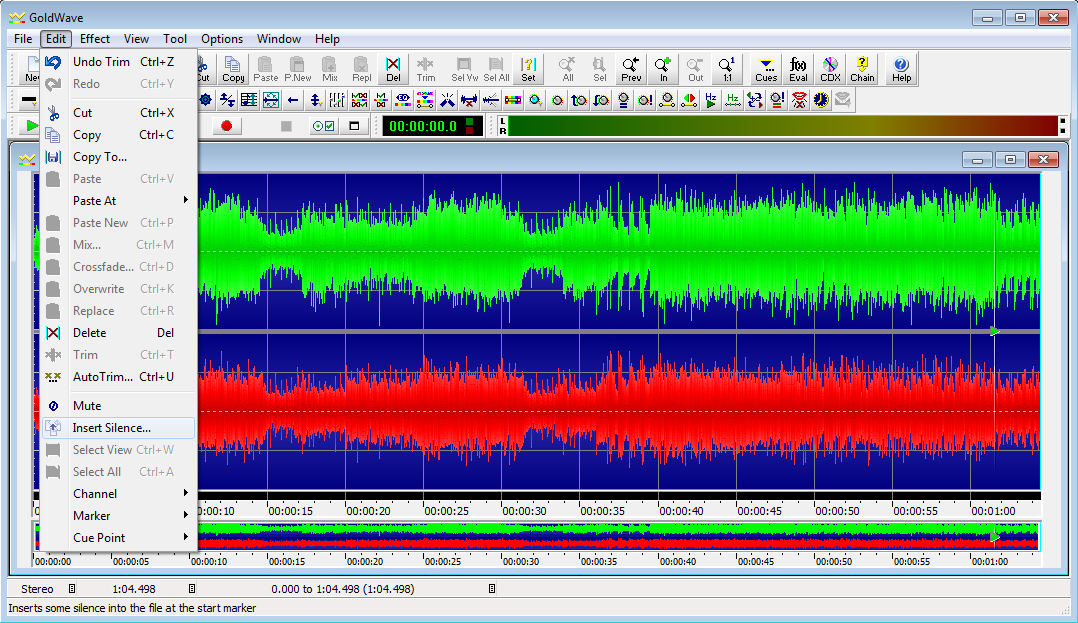
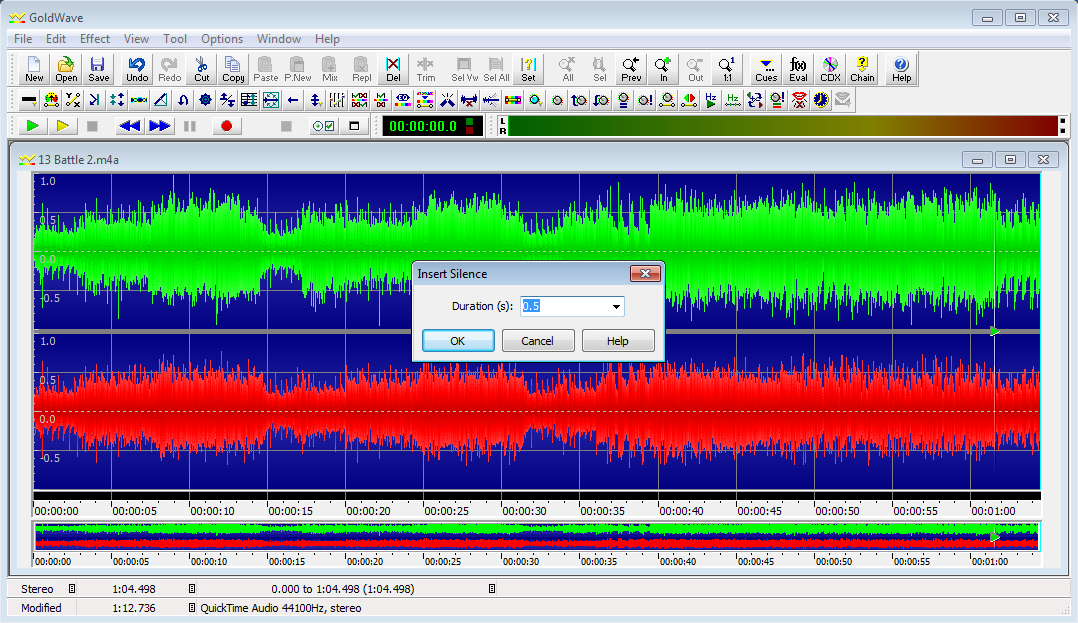
Now press
Ctrl+A to select your entire song. Go to
Edit > Insert Silence and choose
0.5 from the drop-down box. Press
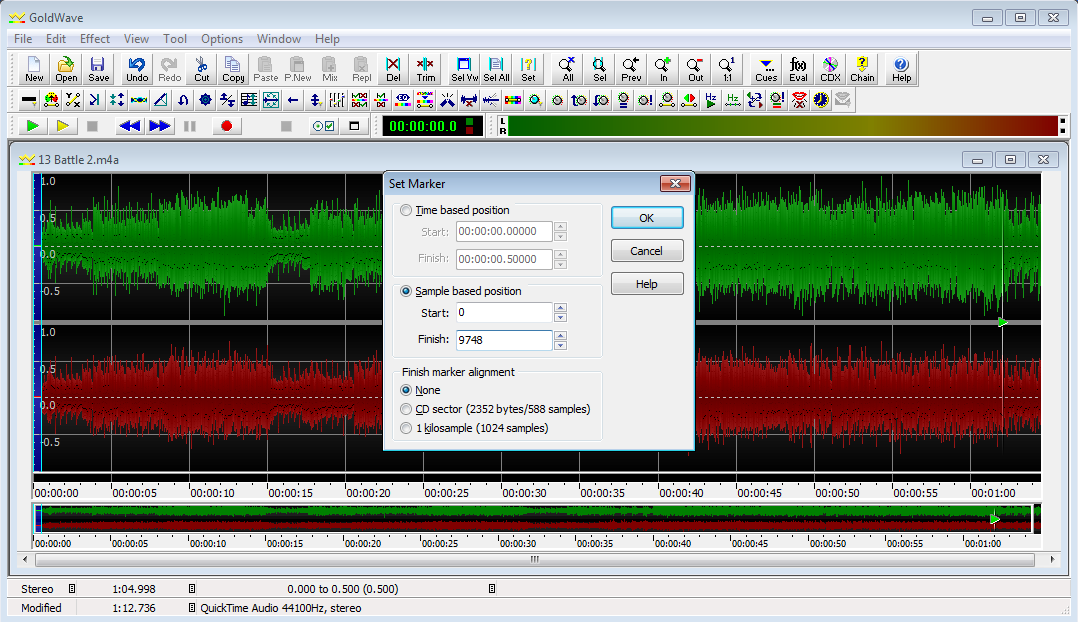
Shift+E again. Subtract the number in
Finish from the number currently stored in your first calculator. Copy and paste the resulting number into
Finish and remove the negative sign. Press
Enter, then
Delete. You’ve now deleted the extra silence, and the loop point you found earlier is now a multiple of
14336.
->
->

->
Compare
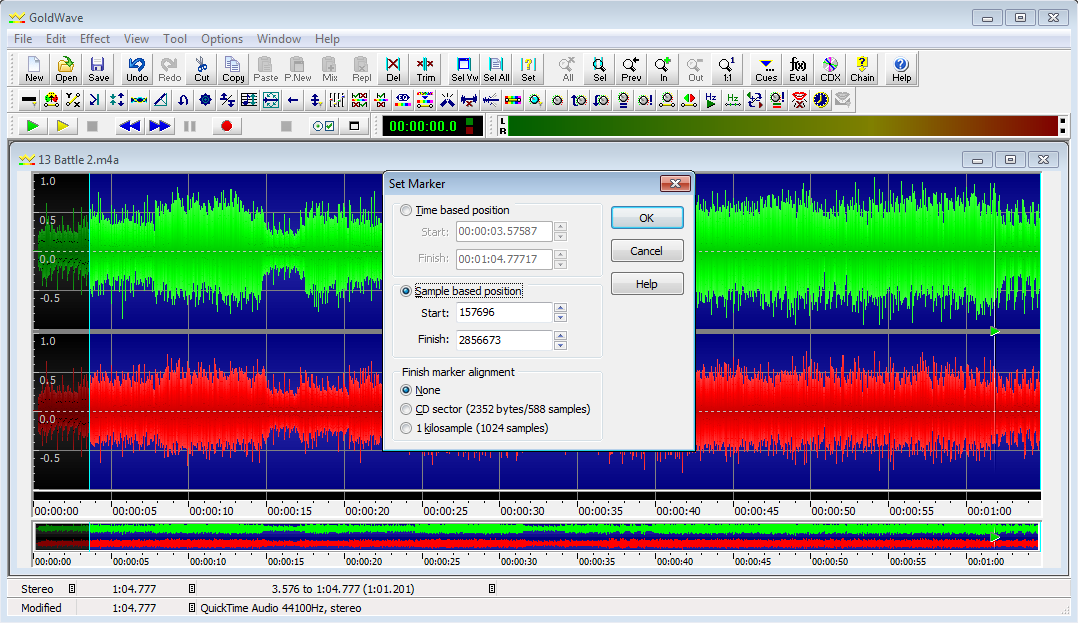
to
To check, press
Ctrl+A, then click the
yellow Play key. Use the same trick from when you were finding your loop point, but paste the number from your second calculator into
Start. It should sound exactly the same as it did before.
Don’t close that second calculator! You’ll need it later, in the Converting stage.
-- Converting (#convert)
--- Stereo or Mono? (#type)
You now have another decision to make. Do you want your song in stereo or mono?
Stereo offers better sound quality at the expense of being twice as large as a mono brstm and having a few more steps in the converting process. (To be honest, I don’t think anyone makes mono songs anymore.)
--- Creating Your brstm(#brstm)
Get to the folder on your hard drive where you extracted the brstm tool. Double-click Start.bat. Enter A for mono or B for stereo, then enter the name of the brstm in OriginalSongs. It will then tell you to "read the enclosed instruction booklet." Instead, refer to the following paragraph that matches the option you chose.
----
Mono (#mono)
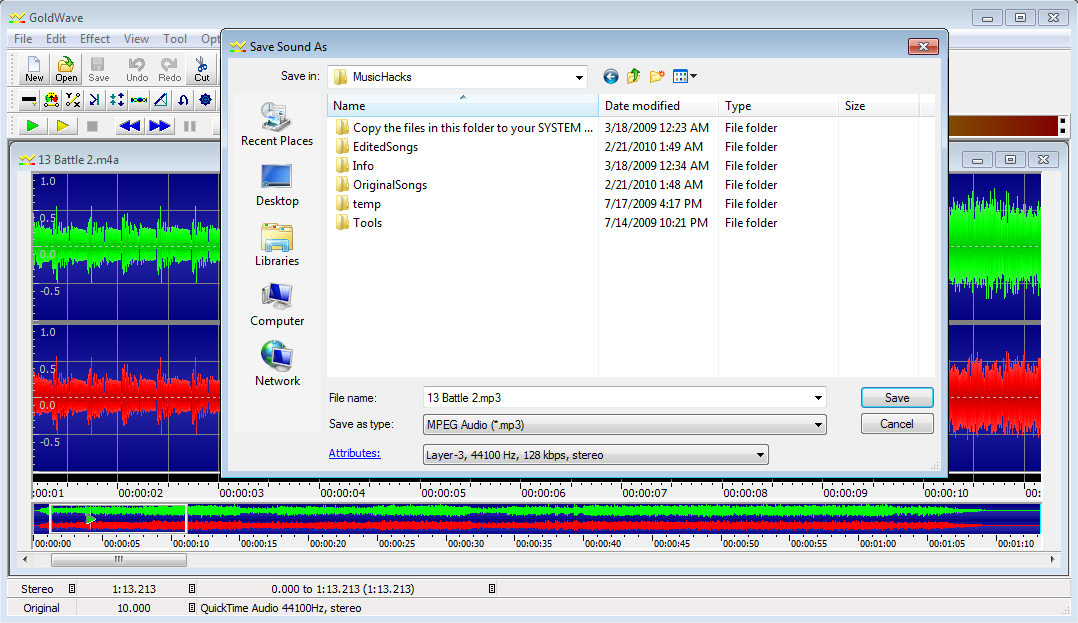
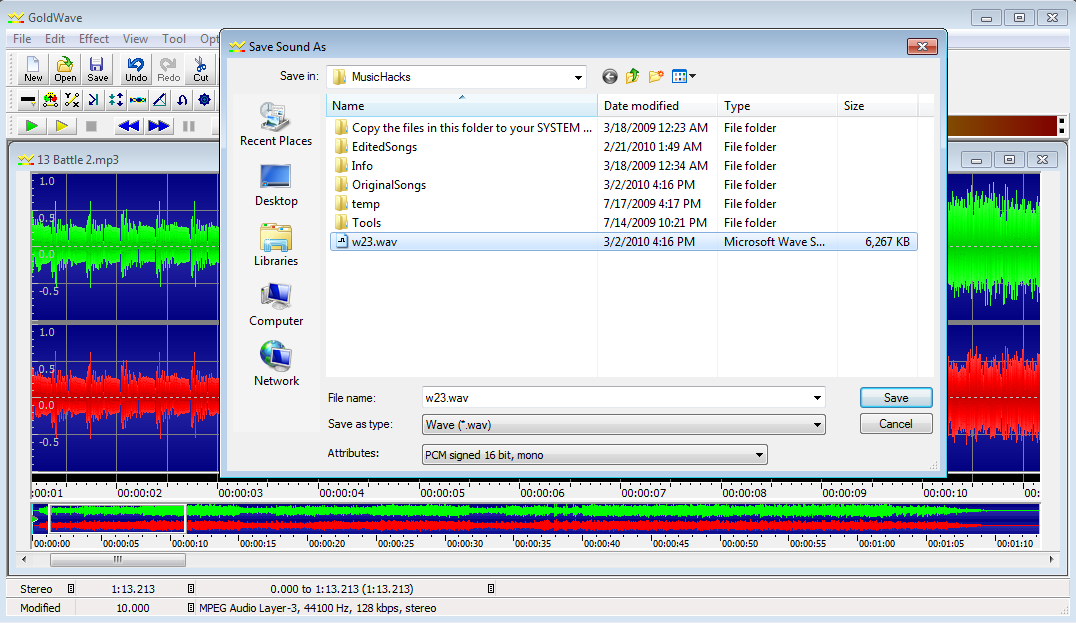
In GoldWave, click
File > Save As. Navigate to the root of the music tool. Change the file type to
Wave and the attributes to
PCM signed 16-bit mono. If you're using the brstm I provided, you will see a file named w23.wav. Save your current song with the same name and click Yes when asked if you want to replace it.
----
Stereo (#stereo)
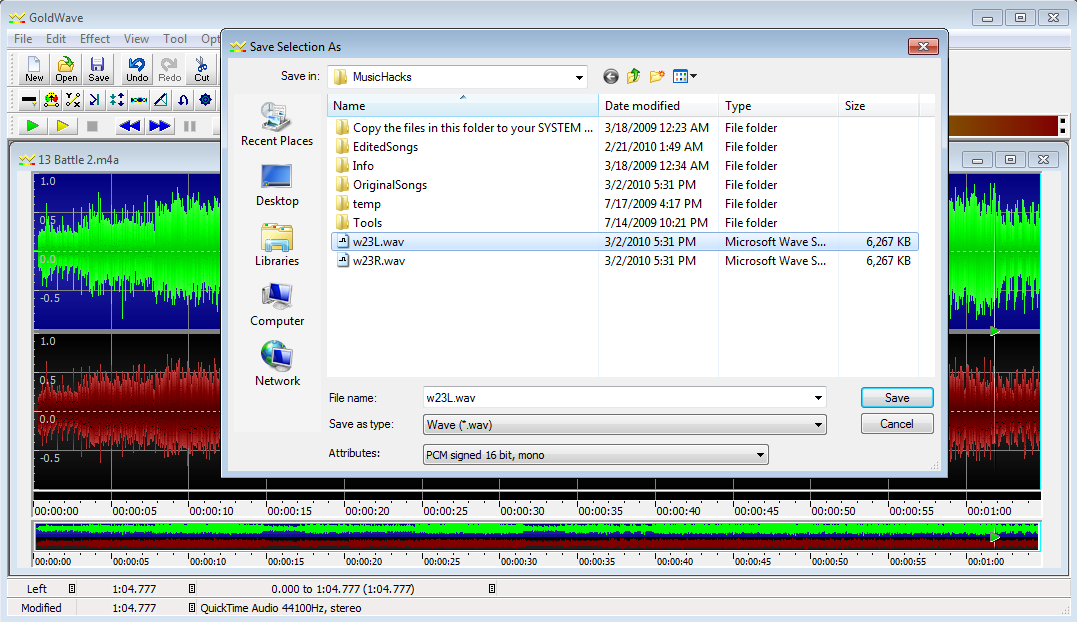
In GoldWave, press
Ctrl+A to make sure you have the whole song selected. Now press
Ctrl+Shift+L to select only the left channel. Click
File > Save Selection As. Navigate to the root of the music tool. Change the file type to
Wave and the attributes to
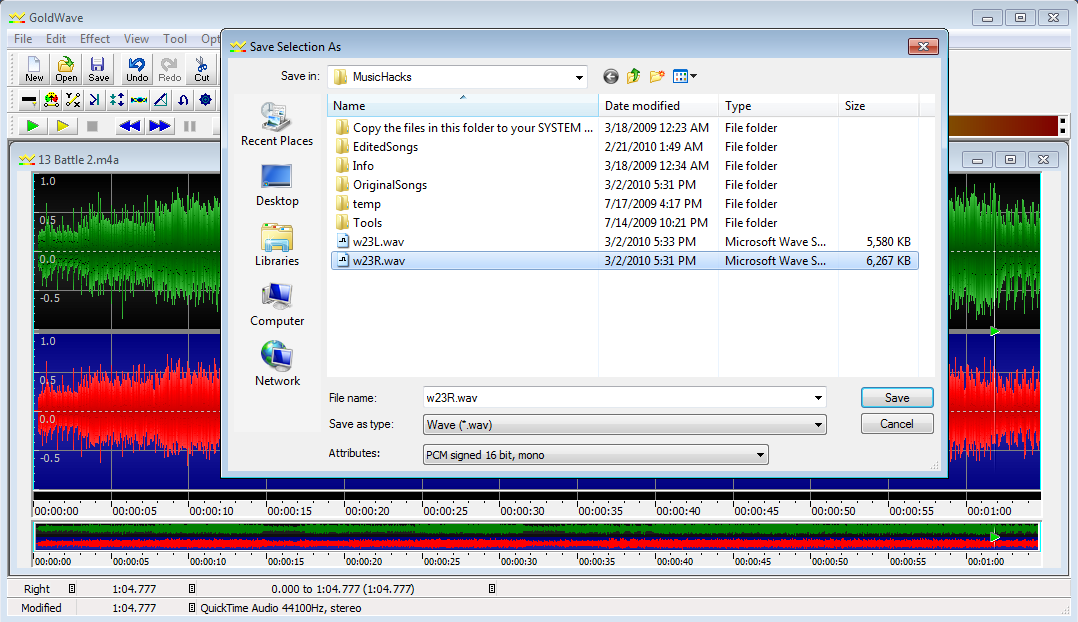
PCM signed 16-bit mono. If you’re using the brstm I provided, you’ll see two files: w23L.wav and w23R.wav. Save the current selection as w23L. Press
Ctrl+Shift+R to select the right channel, then click
File > Save Selection As and save over w23R.
->
->
Go back to the tool and press Enter. When the tool asks for your starting loop point, enter 0 for a regular loop or paste the number from your second calculator for a custom loop. Give the song a name when prompted, and you’re done! If you want to make sure it came out right, jump to the Testing section.
-------------------------------
4. Making a Victory Theme (#victory)
Victory themes are the songs that play after a brawl, at the results screen. They do not loop. However, it is fine to make looping victory themes. If you want to do that, just treat it like a regular song and refer to one of the above sections.
-- Mono (#vmono)
Step 1: Editing Your SongOpen your mp3 or wma or wav or whatever in Goldwave. Edit the song however you like. You may want to do things like cutting out extraneous silence at the beginning or end.
Once you're done editing your song, click
File > Save As and change the file type to mp3. Open MP3Gain and run this mp3 through it to find out the volume of your song. Go back to your song in Goldwave. Click
Effect > Volume > Change Volume and add enough decibels in the upper-right corner of the dialog box to bring the volume to
94 decibels.
You may want to move the mp3 you saved to another folder, to have as a backup in case you want to tweak it later.
Step 2: Using the ToolGet to the folder on your hard drive where you extracted the brstm tool. Double-click Start.bat. Enter
C for mono, then enter the name of the brstm in OriginalSongs. It will then tell you to "read the inclosed instruction booklet." Refer to the following paragraphs instead.
Go back to Goldwave. Click
File > Save As. Change the File Type to
.wav, and change the attributes to
PCM signed 16-bit mono. If you're using the
starter Pokemon brstm I provided, you will see a file named
w23.wav. Save your current song with the same name and say
Yes when asked if you want to replace it.
Go back to the tool and finish up.
And that's it! If you want to check your brstm to make sure it came out properly, skip to the "Testing Your Song in BrawlBox" (#test) section. If you want to get right to inserting it into your game, see the "Adding Your Song to Brawl" (#brawl) section.
-- Stereo (#vstereo)
Open your mp3 or wma or wav or whatever in Goldwave. Go to
File > Save As. Change the File Type to
.wav and the attributes to
PCM signed 16-bit stereo. Save it in the root of the music tool. Edit the song however you like. You may want to do things like cutting out extraneous silence at the beginning or end.
Once you're done editing your song, click
File > Save As and change the file type to mp3. Open MP3Gain and run this mp3 through it to find out the volume of your song. Go back to your song in Goldwave. Click
Effect > Volume > Change Volume and add enough decibels in the upper-right corner of the dialog box to bring the volume to
94 decibels.
You may want to move the mp3 you saved to another folder, to have as a backup in case you want to tweak it later.
Step 2: Using the ToolGet to the folder on your hard drive where you extracted the brstm tool. Double-click Start.bat. Enter
D for stereo, then enter the name of the brstm in OriginalSongs. It will then tell you to "read the inclosed instruction booklet." Refer to the following paragraphs instead.
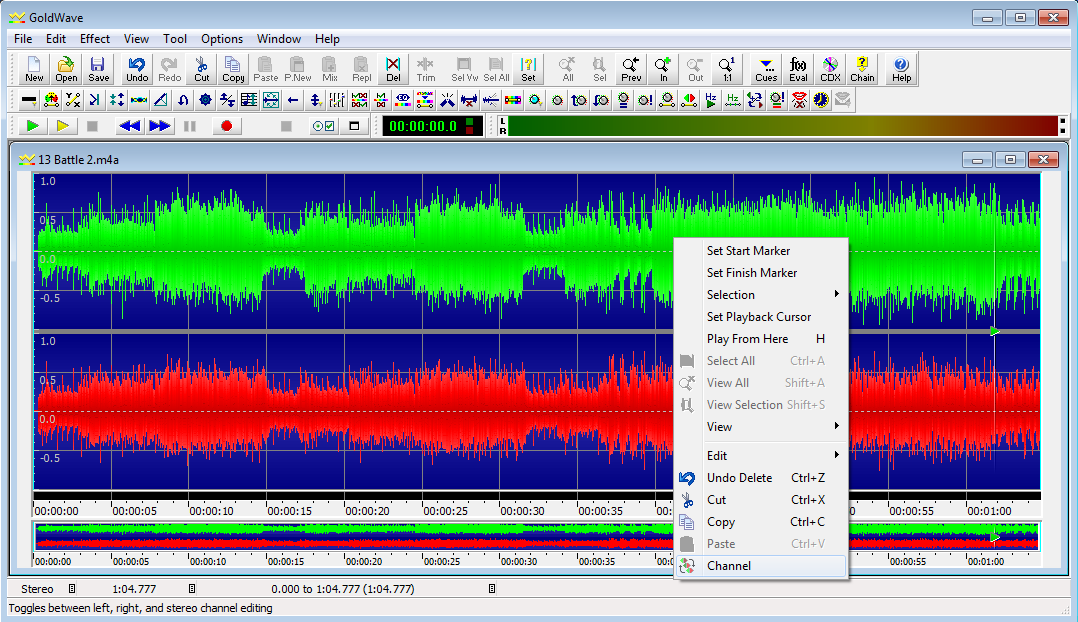
Go back to Goldwave. Press
Ctrl+A. Right-click on the left (upper green) channel and click
Channel to select just that channel. Go to
File > Save Selection As. If you're using the
starter Pokemon brstm I provided, you will see two new files named
w23L.wav and
w23R.wav. Save the current selection as w23L.wav and say
Yes when asked if you want to replace it. Now right-click on the right (lower red) channel and click
Channel. Go to
File > Save Selection As. Name it w23R.wav and say
Yes when asked if you want to replace it.
Go back to the tool and finish up.
And that's it! If you want to check your brstm to make sure it came out properly, skip to the "Testing Your Song in BrawlBox" (#test) section. If you want to get right to inserting it into your game, see the "Adding Your Song to Brawl" (#brawl) section.
-------------------------------
5. Testing Your Song in BrawlBox (#test)
Now that you've made a brstm (or downloaded one from someone else), you probably want to see if it sounds good before you put it in your game. That's what this section is for!
Playing a Song (#play)
Download BrawlBox from the link in #tools. Extract it somewhere. From here, you have three options for playing your brstms: you can run BrawlBox.exe and open a brstm from File > Open; you can make a desktop shortcut for BrawlBox and drag and drop brstms onto it; or you can set up a file association so that double-clicking a brstm opens it in BrawlBox automatically.
However you choose to do it, this is what you'll end up seeing:
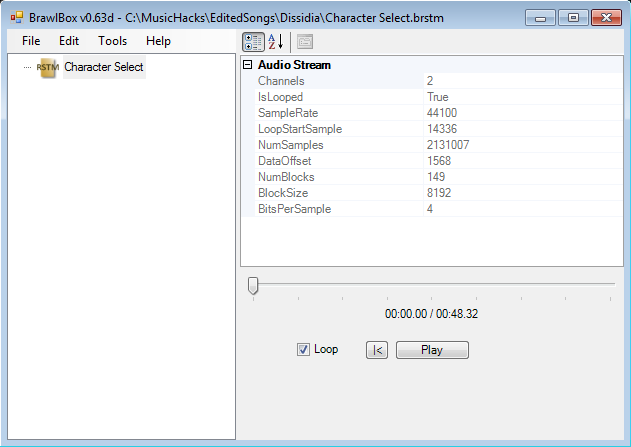
Make sure the Loop box is checked, and press Play. When the song reaches the end, it will loop over. If it sounds good, you're done!
-------------------------------
6. Changing Music Titles (#titles)
So you've added a bunch of your own music to the game, but you want it to feel more authentic? Look no further! In this section, you'll learn how to change the names of the songs in the game and the My Music menu. The SD Loader is compatible with music titles.
Editing info_en.pacInfo_en.pac controls the music titles at the start of a match.
To edit it, use Brawlbox, provided in the #tools section. Open info_en in BrawlBox, and click on MiscData[140]. You'll find the music titles here. Start changing them to whatever you want -- there are no length limitations.
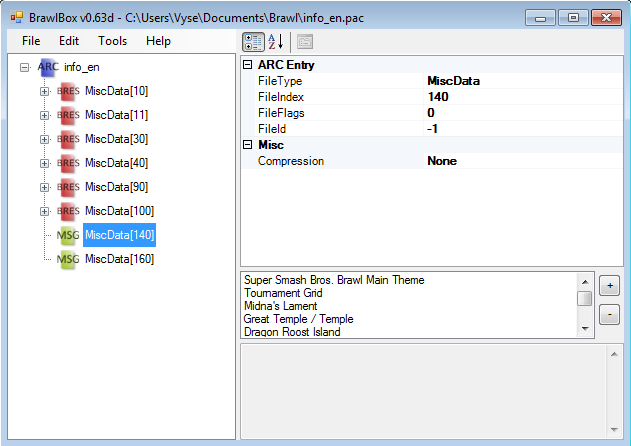
When you're done, click save.
If you are using the SD Loader, look at the size of the file. If it is above 391 KB, you need to click on MiscData160 and start replacing messages you think you'll never see or don't care about with single dashes (-) until the file size drops to 391 KB.
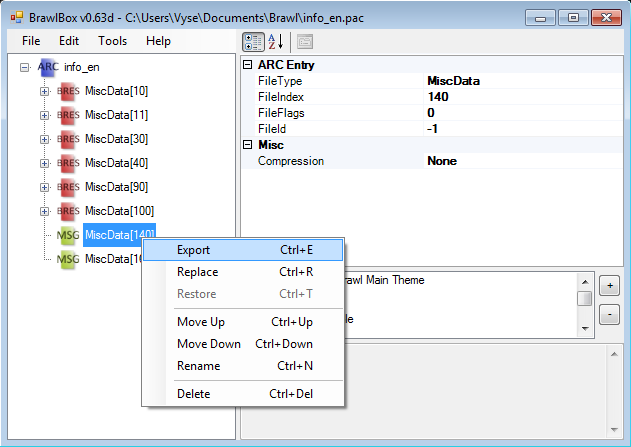
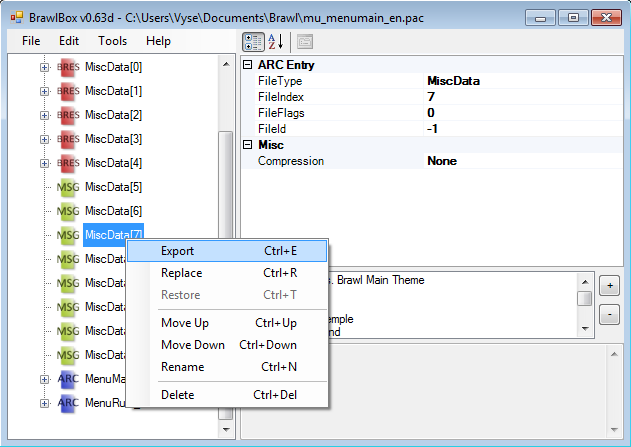
ISO users do not need to worry about this.Editing mu_menumain_en.pacThis file controls music titles in the My Music menu.
Editing this is easy if you've already edited info_en. Just right-click MiscData[140] in info_en, click Export and save it somewhere. Then open mu_menumain, right click MiscData[7], click Replace, and double-click the MiscData[140] you just saved. Save it and you're done.
->
->
 If you're using the SD Loader
 and you had to edit MiscData[160] in info_en, you'll need to export that as well and replace MiscData[9] in mu_menumain with it. Again,
ISO users do not have to worry about this.-------------------------------
7. Adding Your Files to Brawl (#brawl)
Ready to hear your custom song in action? We're almost ready to play!
-- SD Loader (#dsdl)
Create the following path in your SD card and place your songs there. Then use the track list in the first post
here to give the files their correct names.
X:/private/wii/app/RSBE/pf/sound/strm
To add edited music titles: Remove the _en from the names of both info and mu_menumain. The file path for info.pac is pf\info2. The path for mu_menumain.pac is pfmenu2.
That is not a typo.ISO Modification (#isomod)
Make sure you have the track list provided in Needed Tools before beginning.
Open your Brawl ISO in WiiScrubber (make sure you have the key.bin to make WiiScrubber work!).
Expand Data (partition 2), then scroll down to and expand sound. Expand strm to find every music file in the game. Use the Track List to find the song you want to replace. Right-click it and click Load. Navigate to EditedSongs (or wherever you keep your brstms) and double-click the song you want to put in. WiiScrubber will spend... quite a while on this, so be patient. When it's done, it will give you a message ("Replacing complete, now reparsing" or something very similar). Click OK, and after a moment, you will be back at the root of the ISO. Navigate back to strm and replace the next track you want to change. Repeat for every song you want to add. When you're done and WiiScrubber has reparsed the ISO, click X to close it (click Yes when asked if you're sure).
If using the USB Loader, follow the instructions in the link provided with it in #tools. If using the backup launcher, install it on your Wii. Put a DVD in your disc drive, run ImgBurn, set the burn speed to 2x, and begin. Ignore the message telling you there's not enough space (assuming you're using the full ISO and a single-layer DVD). After a while (about 55% completion), you will get an error saying it ran out of space. Ignore it, then tell it to finalize the disc anyway when prompted. Put the disc in your Wii and play!
Enjoy your custom music!


 eum
eum