◆ Introduction ◆
Ever see those really awesome looking CSPs but wonder how the heck the artist made them that way?
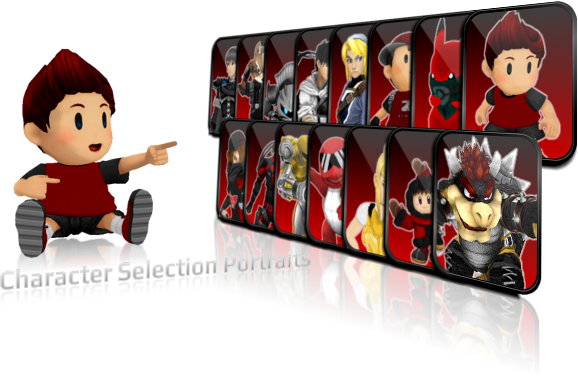
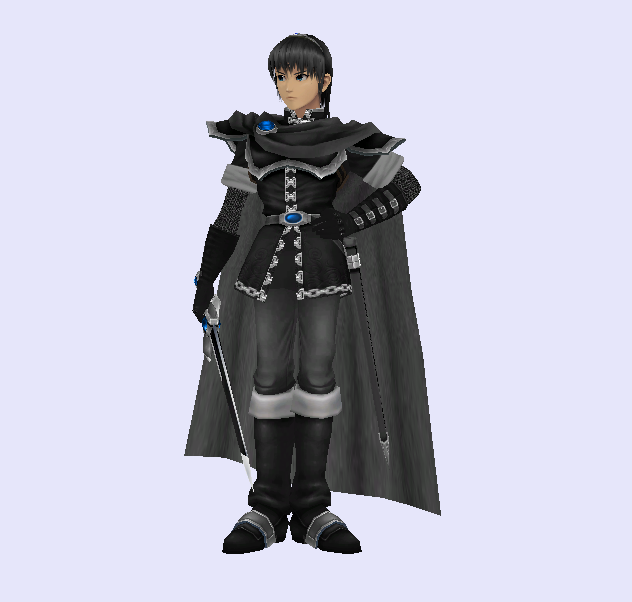
Usually they look something like this:
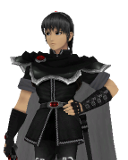
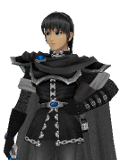
Nice, clean, and uniform; and I'm here to thoroughly show you how to do it!
I'm sharing this information for a few reasons. One, I have wondered for a very long time how to do what I'm about to show you. I searched and searched for this information but found no guides or anyone sharing this information (it's a lot to explain though, so I don't really blame them). So after much time and experimenting, I found out on my own, and want to share it with you guys. Another reason for me sharing this is because a lot of the good CSP artist are becoming a bit more inactive. I'm giving out this information in hopes that some will take it and open up high quality CSP request "shops" and such. I now know how to make these, but unfortunately, I don't have enough time in my day to actually take CSP requests and things like that. So hopefully I'm passing this knowledge on to those of you who can and will.
But now that I've said all that, let's get into it, shall we?
◆ Main Things You Will Need ◆(You can pick these things up in the Vault or the Resources page.) • BrawlBox •• GIMP •(Or Photoshop, etc., but I will be using GIMP.)• Character Selection Screen File •Get the orginal | Use your own | Get one from the Vault• Character hack •(The one you want to make the CSP for.)
◆ Making Your Character Pose ◆
In this section I am going to show you how to make the "pattern" for your particular character. This is where you get to have the fun of choosing what your character's CSP pose will be.
 ♦ 1.
♦ 1. Make a folder somewhere (desktop is recommended―for now at least) and name it "CSPs".
♦ 2. Inside your "CSPs" folder, make another folder titled the name of your character (again, "Marth" in my case, but just name it the character you're using. This folder is for your easy access later.
♦ 3. Now, open up your
Character Hack in
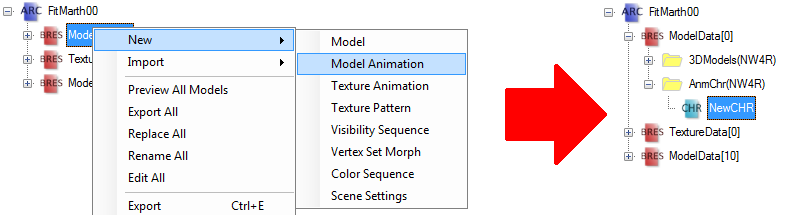
BrawlBox and right click on "ModelData[0]" then hover over "New" and click "Model Animation". You just made a new file named "NewCHR" (we'll rename it later) which, in short, is the file that will hold your character pose information once we make it.
♦ 4. Click on the (+) next to "ModelData[0]" then do the same for "3DModles(NW4R)". Right click on the regular or
trophy (read down) MDLO, and hit "preview".
TIP: If you want to use the original character poses (the ones that the characters use in the non-hacked CSPs) then get the trophy model of that character. You can find them here. Marth's is named "MarthR1.brres" and the other characters' are named "[name]R1.brres" as well. Just note that you cannot edit bones in trophy models (I'll explain it when we get to it).
Just open the .brres file in BrawlBox, click on the (+) next to "3DModles(NW4R)", right click on the MDLO, hit "export", and save it somewhere. Then close out that BrawlBox, go back to your Character Hack in BrawlBox, right click on "ModelData[0]", click on "Import", select the model you just exported from the .brres file and click "OK".
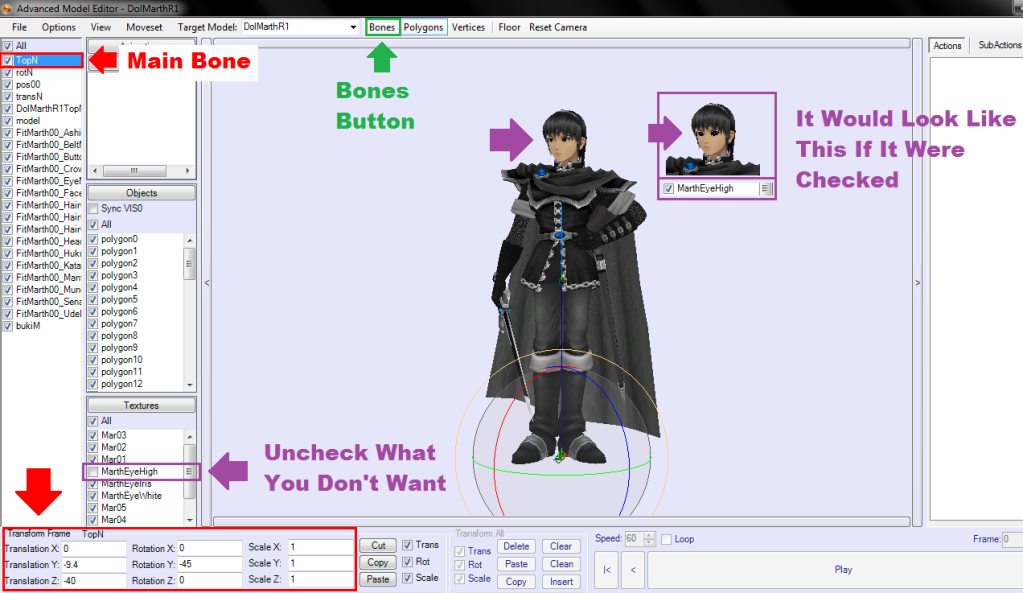
♦ 5. Open up the panels in the preview. You'll see the list of bones, polygons, textures and animations. In the animations section you should see that "NewCHR" file we just created in step 3―click on it. Since you clicked on it, that tells BrawlBox that the edits you make to bones and polygons will now be written down on that "NewCHR" file.
♦ 6. Here come the fun parts (at least to me anyways). You're going to want to turn off all polygons and textures that just get in the way. In Marth's (and many others') case, his eyes are blocked by his highlight texture. As in other cases, Link has two swords (Marth too, actually) and two shields (one on his back and one on his arm―turn one of them off). Some characters have things like that, so just look out for those and turn them off.
♦ 7. Now, the bones. You get to figure out the pose you want your character to be in for the CSPs! To select your character's pose for the CSP, select his main bone (usually the first one in the list) and change the coordinates for the bone using the bottom panel. You can also do this for other bones to move arms, legs, etc.
Once you're done figuring out the pose, click on the "NewCHR" file in the animation tab and click "save" above it.
Then right click the "NewCHR" file and click "Export". Feel free to rename the pose to whatever you'd like.
NOTE: Now that you've saved and exported your .chr0 file, you can load it on any character and he or she will assume the pose you just created. To do this, click "load" instead of "save" in the animation tab, and then selcet that file you just exported. Cool, huh?
◆ Changing The Position of the Eyes ◆
Alright, this part
can get a little confusing at first but I'll try to explain it the best way I can. It's actually not hard at all once you know how to do it though.
The eye movements are basically just attachments to your pose. Meaning, you have to have a pose (.chr0 / Model Animation) in order for this to work (which we already did, so don't worry). Alright, so:
♦ 1. (Close out the preview window if you still have it open) Right click on the BRES ModelData, go to "New" and click on "Texture Animation.
♦ 2. Rename both the
model animation data and the
texture animation data to the same thing (it doesn't matter what you name them, they just have to be the same that way BrawlBox knows to associate the two together).
♦ 3. Right click the texture animation data and click on "New Entry". This made a new data file named "NewMaterial". Right click on the "NewMaterial" and click "New Entry" (do this twice--since there's 2 eyes).
♦ 4. Now that that's done, go back to previewing your character's model data and turn off all the polygons you don't want to be shown, and well as the eye highlight texture and the yellow eyes texture.
♦ 5. In the Animations tab click on "CSP Pose" (I named it "CSP Pose" but just click on whatever it is you named it). Next, click the drop down tab that says "CHR0" and select "SRT0." Then once more, click on the "CSP Pose" (or, again, whatever you named it).
♦ 6. From here, we're gonna be doing things in 2's (since there's 2 eyes xD).
In the polygon section, find polygons that are the eyes (there will be two of them). Click on one of them and then click on the eye texture in the textures tab (in Marth's case it's "MarthEyeIris"--other characters' will probably be something similar). Then set the position of the eye in the bottom tab.
Repeat this step except with the other eye polygon selected.
♦ 7. Once finished, be sure to save and export it so you'll have it for later.
◆ Editing the Lighting in BrawlBox Previews ◆
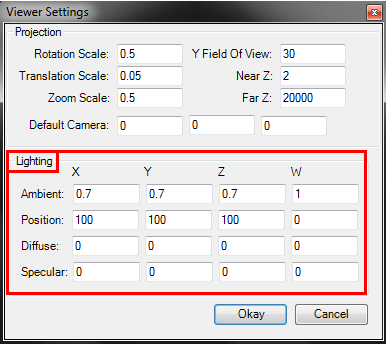
So, if you just finished the bones and thought you were done, you are mistaken. xD We still have to fix the lighting for the picture. To change the lighting, first open up the preview again. Next, open the upper panel and click on "Options" → "Viewer settings".
Now, this actually isn't that hard at all. I've generally found that it's best to keep the X, Y, and Z all the same number unless you want to try to get fancy.

If you
do want to try to get fancy, then by all means, mess around with it and have fun! See what you can come up with.
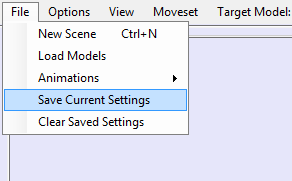
My recommended light settings are as shown in the example picture. It's simple, bright and has a nice "feel" to it, in my opinion. When the lights are to your liking, DO NOT leave the preview. Click on "File" (while still in the preview―if you don't see it, then pull down the upper panel) then "Save Current Settings" as shown in the example picture below.
After you click this, a pop-up widow will appear asking you if you want it to maximize next time―click "yes".
◆ Lights, Camera, Edit! ◆
Alright, you have the pose, you have lights, you have the power!
Open up the preview one more time. Make sure the preview is maximized and that all the panels are closed. You should have something with your character that looks like this (except with you character, pose, and lighting):
♦ 1. As you may have guessed, you're going to take a screenshot of that and paste it in GIMP (or the program you chose). If it is a "floating layer" when you paste it, then click on "new layer".
♦ 2. Then right click on the layer (or select from the "Layer" tab) and click on "Add Alpha Channel". If it was faded out where you can't click it, that just means you already had it, which is good.
♦ 3. And now to give it a transparent background. We'll do that by mainly using the Fuzzy Select Tool

. Click on the background and then hit the delete key. If it still looks rough around the edges, just take a little time to clean up the sides.
♦ 4. Click on "Image" then click on "Autocrop Image". This will cut down your image just to the parts that actually have colored pixels to them while all the mass empty spaces get cropped out. You should have something along this idea now:
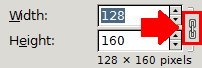
♦ 5. Scale the image. Make sure the links are connected. It doesn't matter what the height is at this point. Just make sure the links are connected and width is set to 128 pixels.
♦ 6. Click on your layer and move it down 10 or 15 pixels (that's 10 or 15 taps on the 'down arrow' key.) This makes it so that the face of the character isn't blocked out by the "READY TO FIGHT!" bar. If it's a character like Pikachu where his ears take up the space at the top, then don't worry about doing this step.
♦ 7. Once you've done that, get the crop tool. Start from the top, and drag it down to 160 pixels as in the example below.
Crop it, save it (as a .png file) and you should be left with a 128x160 picture, also known as, a CSP.
◆ Putting Your New CSP in Your Character Select Screen ◆
So, you remember that
Character Selection Screen File I mentioned earlier? Yup, that's finally going to be put to some use now! Go ahead and open that up with BrawlBox. Open up "char_bust_tex_lz77" and find the character you're looking for, using this list:
MiscData[00]: Mario
MiscData[01]: Donkey Kong
MiscData[02]: Link
MiscData[03]: Samus
MiscData[04]: Yoshi
MiscData[05]: Kirby
MiscData[06]: Fox
MiscData[07]: Pikachu
MiscData[08]: Luigi
MiscData[09]: Captain Falcon
MiscData[10]: Ness
MiscData[11]: Bowser
MiscData[12]: Peach
MiscData[13]: Zelda
MiscData[14]: Shiek
MiscData[15]: Ice Climbers
MiscData[16]: Marth
MiscData[17]: Mr. Game & Watch
MiscData[18]: Falco
MiscData[19]: Ganonderp- I mean, Ganondorf
MiscData[21]: Meta Knight
MiscData[22]: Pit
MiscData[23]: Zero Suit Samus (ZSS)
MiscData[24]: Olimar
MiscData[25]: Lucas
MiscData[26]: Diddy Kong
MiscData[27]: Pokemon Trainer
-------->MiscData[28]: Charizard
-------->MiscData[29]: Squirtle
-------->MiscData[30]: Ivysaur
MiscData[31]: King Dedede
MiscData[32]: Lucario
MiscData[33]: Ike
MiscData[34]: R.O.B
MiscData[36]: Jigglypuff
MiscData[37]: Wario
MiscData[40]: Toon Link
MiscData[43]: Wolf
MiscData[45]: Snake
MiscData[46]: Sonic
Once you've found it, find the color you want the CSP to replace and then right click on it and click "replace".
◆ Conclusion ◆
And that, my friends, is how CSP are made and installed. I hope you guys enjoyed this tutorial and I hope it was useful to you all somehow.
If you'd like to do other CSPs for the same character, remember, you saved the template. All you have to do is replace the textures with the new ones, and then edit it just the same exact way we did it with the first one and they should could out looking like this.
If you liked the texture I used in the examples, you can download it from
my vault. The other texture is a texture that can only be found on
my site.
Happy CSP making everyone and take care!
-
Red