|
|
 |
« on: January 20, 2012, 04:24:32 AM » |
|
Well well, wouldn't think I'd share my style would ya? here it is.
*weather you buy or keygen, is entirely up to you and I shall not be held responsible for your decisions
Before we begin, this tutorial Requires:
Sony ACID Pro
BrawlBox V 0.65 (or 0.64)
Noise reduction Plugin (register with keygen or buy it to remove beeps)
[SFX ONLY] Smashbox | (Click here for smashbox if you are using windows 7 64-bit like I am)
THERE IS A VIDEO AT THE BOTTOM THAT YOU CAN USE IF FOLLOW-ALONGs ARE YOUR STYLE
once you have that AND the noise reduction plugin installed and activated (restarting ACID),
You have 2 options from this point LOL! you can:
Use this file and skip the setup (Skipping to the audio file section) [but please, before you work on a new music hack, right click near the markers and (markers and regions) DELETE THEM ALL]
*Note, when using my file, select ignore all missing files and leave them offline, then delete the blank clip (the markers in there are loop points for "you spin me right round", DON'T BOTHER UPLOADING THAT, I already made a copy to upload)
OR
==================
Set up ACID from scratch
==================
1) open a new project and add an Audio track by right clicking the area shown and selecting it (CTRL+Q)

2) Pop open the FX box and add some Effects, leaving the track EQ alone for now
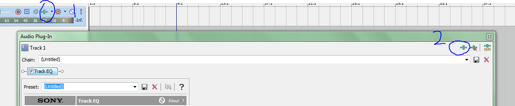
3) Add these FX in ORDER: Sony Volume, Graphic EQ, (Slide Track EQ to this slot), Clipped Peak restoration, Click and crackle removal
Your Chain Should look like this:

Click OK
(DOUBLE CLICK THE MASTER AND TRACK VOLUME SLIDERS TO RESET THEM TO 0)
=============
Adjusting the FX
=============
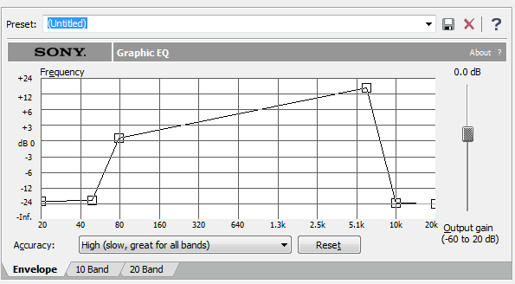
4) the BIG one we want to go for first is the graphic EQ, go to it and make sure you are on the envelope tab. Copy this pattern: (points are added when you drag the line)
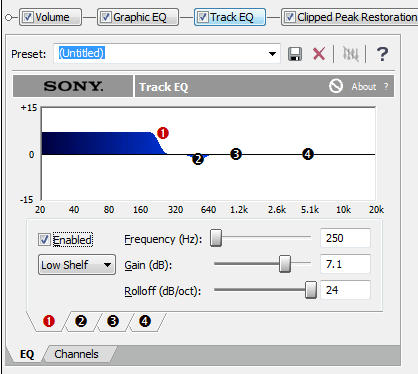
5) Track EQ: (this will be restoring the bass the graphic EQ took out) enable envelope 1 and set the frequency to 250 and the mini-dropdown to low shelf
as for the gain, you are free to adjust it to your liking when listening to an audio file within ACID
6) Clipped Peak restoration (AKA the safety net): just go to it and have ALL the boxes checked (You will NOT be touching the slider unless necessary [when the red bar drops too close to 6 WITH the volume low])
7) Click and crackle removal (Will remove clicks caused by "looping"): Just set the preset to remove Lots of crackle
============================
adding a wav (or MP3) and optimizing it
============================
8 ) now drop your audio file in the timeline, sliding it to the left and
a) zoom in on the beginning and drag the side of the clip to edit out the silent part
9) TURN ON LOOP

10) Double click the audio clip on the timeline to set the Loop Region to it
11) Play the project and
a) right click the clip and go to event clip (spawning a sub menu)
b) select Normalize
12) go back to the FX and select the volume tab
a) Play around with it ( with the system volume at max) until the volume sounds like it's as loud as it can go (you can adjust the final volume later with the master slider
b) go to the Clipped peak restoration tab, the red bar should be reading volume levels upside down, DO NOT LET IT GO PAST 6, the halfway point (quick millisecond jumps past it are ok), the meter should on average be constantly showing at least a sliver of red
c) if the clipped peak restoration meter is dropping below 6 or hanging around it, go back to the volume tab and decrease it, if it is STILL hanging around 6, THEN adjust the slider in the clipped peak restoration tab
13) Track EQ: play around with the gain and rolloff until the music sounds decent to you
Noted out in KCMM chat* ) if you plan to loop at the end and your MP3 fades out, press V, double click the line at where the fade begins, double click the mute part of that line, and drag that point all the way up. This will *mostly* undo the fade-out
if all sounds good, GREAT onward to looping (don't go to brawlbox just yet)
=============================
Looping your song (Hopefully PERFECTY)
=============================
14) you should see a dark blue bar above the timeline the same length as the clip, this is the Loop Region and as long as loop is turned on, the music will loop within these points, this is the accuracy advantage you have over finding them in brawlbox through guesswork:
a) Drag the Right hand end of it to the expected end of the song before it loops
b) Do the same for the Left Hand end, Only this one is for your Beginning loop point
15) play around with these points until you have found a PERFECT LOOP (Or decent one), you can fast forward (skip) close to the end loop to re-test as it will loop with no stop/start delay like it does in brawlbox
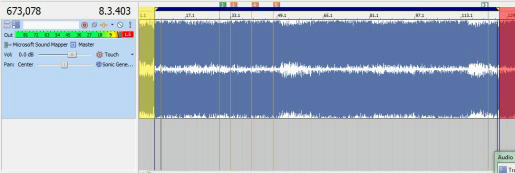
^the red and yellow highlights show its similarity to the brawlbox loop markers
16) Once you have found the loop points, click on the clip, the beginning loop and zoom ALL THE WAY IN (without losing sight of the loop point's line) and place the play cursor EXACTLY on the blue line (you can use the arrow keys to nudge it there)
17) Make sure the time is read out in samples, if it is not, right click the time readout and change the time format to Samples
18) Now you can go ahead and adjust that master volume (vertical slider) to a more suitable volume (just be warned, setting it too low under 0, will result in it being too soft in brawl) (I recommend leaving it at 0)
19) press M on keyboard to place a marker (you will delete this marker AFTER you make your BRSTM file to avoid confusion on your future projects)
20) slide the beginning loop point of the Loop region ALL THE WAY TO THE LEFT END OF THE TIMELINE
21) (with the cursor still on that beginning loop), Render as Wav (checking the box Render Loop Region only [ this will eliminate the need to adjust the end point in brawlbox])
===========
BrawlBox Part
===========
22) Open brawlbox and go for your usual New BRSTM, and open your rendered wav from ACID
23) Remember that time setting in ACID? the cursor should still be at the loop point (if it isn't you can click on the marker you placed to easily restore it) copy the time (AKA samples) value (by that I mean type it out) into the start field (your start loop point setting) and press enter
23) the moment of truth: enable the loop checkbox and TEST IT, it should be PERFECT or at least NEAR PERFECT
24) create the BRSTM and enjoy (you don't have to name it to the music you want to replace as I have made a renaming program GUI to make this easier)
=============================================================================
feedback welcome on this part
1) Optimising SFX generally follows the same steps for BRSTMs except they skip the looping part and has the EQs off MOST (not all) of the time (so go and make those adjustments from the BRSTM guide)
*the steps taken in acid should ONLY follow the volume optimisation steps (of cource you are free to do your OWN adjustments, in which case, SKIP to the rendering step)
================================
Converting to mono and frequency settings
================================
2) if you have your SFX set and loop region highlighting the whole clip (or part you want to SFXify), RIGHT CLICK the clip, go to the first option (spawning submenu), then go to CHANNELS, and choose either:
Left Only
Right Only
Combine (RECOMMENDED)
========
RENDERING
========
3) Go to render as (in file or the render button)
4) set the format to WAV, and CLICK CUSTOM
5) set the channels to MONO
6) set the frequency to:
48KHz (if if falls within the target SFX's time and it's frequency is the same)
32KHz (recommended) (If the target SFX is 48KHz, but the length is longer)
16Khz (for EVERYTHING ELSE)
6KHz (if the SFX you are making is for the wii mote sound)
7) click ok then render it
8 ) (THIS PART MAY LOOK DIFFERENT IF YOU ARE USING WINDOWS VISTA or 7 32-bit) the reason why my smashbox window look like XP is because I am using it on a 64 bit OS, If you would like to lean how to get it to work (AND PLAY SOUNDS [this is what doesn't work with it on 64 bit], click the guide link in my sig)
open smashbox and find the Group ID, Collection ID, and wave ID of the SFX you want to replace and copy those into Sawndz
(Example Images below for noobs)
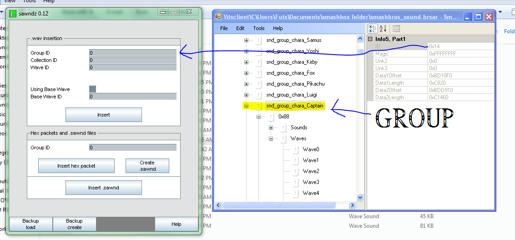
^Group ID

^Collection ID
^Wave ID
9) Click Insert (Not insert sawnd lol [noobs])
10) CLOSE THE OPEN BRSAR IN SMASHBOX (or close smashbox) (LEAVING IT OPEN WILL RESULT IN SAWND FAILURE)
11)go to and double click the sound you rendered, and wait for the next step
12) SUCCESS! go test
fake step 13) I am looking forward you your feedback, if you have problems with running smashbox in windows XP mode, let me know in the smashbox on 64 bit guide
=============
Word of Advice
if you take that extra mile, ANYTHING can be looped
========================
EXTRAS!!
if you feel like having some fun, you can play around with the other plugins. Here is one you can use to replicate the effect mariokart DS, wii, and 7 does to the music if you get shrunk or shocked using the vibrato effect:

Just copy the graph and slider values
|


