Home Gallery Resources The Team Rules chat Login Register
Pages:  [1] 2
Author Topic: Fixing Differing Face Normals.  (Read 6973 times)
0 Members and 1 Guest are viewing this topic.
Spex130
Holy Kitten
*
Offline Offline

Posts: 1958


So very Spexcellent.

  • Awards Super Saiyan Topic Starstormer Hyperactive Contributor Renowned Hacker

  • View Profile Awards
    « on: February 06, 2012, 05:31:33 PM »


    So, if you came here, you’re probably trying to fix up a model that has a face that’s split up into parts. Like the Tales series models. Or Toon Link.

    Odds are, your model most likely looks like this:


    We don’t want that.

    Before we start, I need to tell you that this guide is pretty rushed. You’ll need to know how to get around 3DS Max at least a little. Just saying.


    So, first, get your model into 3DS Max some way or another. Then go to the models that are at odds with each other and select them. All of them. Eyes, mouth, face, anything that’s clashing. Then right-click and select “Hide Unselected” That will hide (but not delete) anything you don’t need.

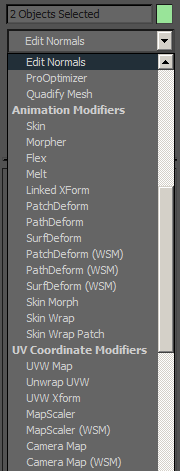
    Once you’ve selected them all, go to the right pull-down bar and select Edit Normals (Or if you’re a shortcut freak like me, just press “E” 4 times after selecting the pulldown bar.)


    Once you’ve selected that, your model should look covered in red pins. That’s because you’ve got all of the normals selected. Click on the Edit Normals bar on the right side a few times until they all change to something blue-green-not red-ish. You also might want to change the "Display length" to something shorter so the normals are easier to choose.


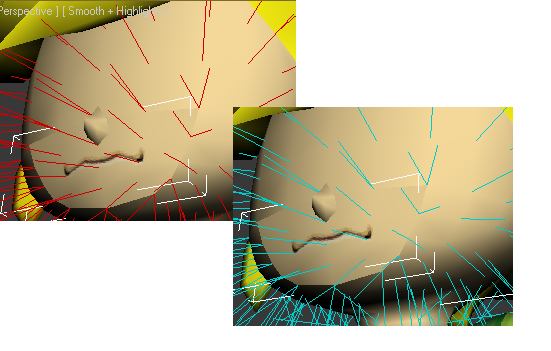
    After that, you’ll need to go to the spots that clash. Odds are, the modeler ripped the faces right out from that spot, so all the vertices will be in the same spot, and therefore the normals will be too.

    In the spots where the normals clash, there will be a lot of lines sticking out all leading to one point. Select all the ones that lead to that one point. Then go to your right panel, and under the average option you should select “Selected”

    This will make all of those lines look like one line, which means they all take light from the same direction and will transition smoothly. REMEMBER: Only select the normals that lead to the same vertex. Trying to do this en masse on multiple normals with multiple vertices will cause your model to behave like reflective tape. Only choose groups or normals that lead to one vertex before you average.


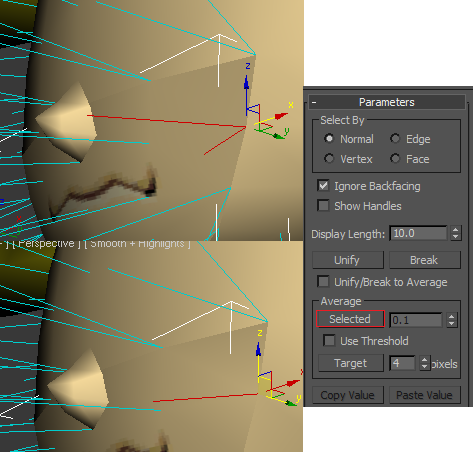
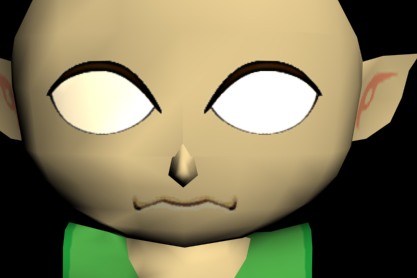
    Now, here’s the part where your judgment comes in. Do that for every spot where the Normals are strange. After that, you should get a result close to this.


    I know this was rushed, but that’s pretty much it.

    Ask questions, leave feedback, please!
    « Last Edit: February 09, 2012, 05:40:38 AM by Spex130 » Logged


    ramonM64
    Supreme Kitten
    ********
    Offline Offline

    Posts: 671


    moving past the feeling

  • Awards Super Saiyan Topic Pin Collector Starstormer Renowned Hacker

  • View Profile Awards
    « Reply #1 on: February 06, 2012, 06:19:21 PM »


    wh00t     another great guide Spex. i understand every bit of it, it looks good as is.

    i wanna give it a go right now.

    wh00t     got the face fixed. it was easier than i thought

    you might wanna mention lowering the Display Length. for awhile i kept tryin to click the right lines without it clicking a unseen line.
    « Last Edit: February 07, 2012, 01:03:33 AM by ramonM64 » Logged


    Spex130
    Holy Kitten
    *
    Offline Offline

    Posts: 1958


    So very Spexcellent.

  • Awards Super Saiyan Topic Starstormer Hyperactive Contributor Renowned Hacker

  • View Profile Awards
    « Reply #2 on: February 07, 2012, 06:27:32 AM »


    wh00t     got the face fixed. it was easier than i thought

    you might wanna mention lowering the Display Length. for awhile i kept tryin to click the right lines without it clicking a unseen line.


    I told you it was easy.

    Also, is that how you make it click easier? Thanks, I'll add it in soon.
    Logged


    Gamma Ridley
    ~Mercenary~
    Boss Kitten
    ****
    Offline Offline

    Posts: 4606


  • Awards Featured Super Saiyan Topic Heart Container Famous Hacker

  • View Profile WWW Awards
    « Reply #3 on: February 07, 2012, 03:25:39 PM »


    So does this come before or after rigging? Or does it matter?
    Logged


    Spex130
    Holy Kitten
    *
    Offline Offline

    Posts: 1958


    So very Spexcellent.

  • Awards Super Saiyan Topic Starstormer Hyperactive Contributor Renowned Hacker

  • View Profile Awards
    « Reply #4 on: February 07, 2012, 03:54:30 PM »


    It shouldn't.

    Just place it under the skin modifier before export.
    Logged


    Gamma Ridley
    ~Mercenary~
    Boss Kitten
    ****
    Offline Offline

    Posts: 4606


  • Awards Featured Super Saiyan Topic Heart Container Famous Hacker

  • View Profile WWW Awards
    « Reply #5 on: February 07, 2012, 03:55:19 PM »


    Ah alrighty, just wondering.

    Thanks for the tutorial, I'll be saving this one just in case I ever need it.
    Logged


    Jocky
    Expert Kitten
    ****
    Offline Offline

    Posts: 55


    Ghosting!

  • Awards Dedicated Hacker Favorite'd Featured

  • View Profile Awards
    « Reply #6 on: February 07, 2012, 04:46:31 PM »


    Hm.... is there anyway to use the normal's settings from another object?
    I can't seem to get this right.

    (This is the re-import file)
    http://www.mediafire.com/?i119s1t1ei4uwk3

    This is the mouth of an untouched TLink model

    This is my reimport


    And this is the attempted fix

    Not a pretty sight
    « Last Edit: February 07, 2012, 04:47:22 PM by Jocky » Logged

    Spex130
    Holy Kitten
    *
    Offline Offline

    Posts: 1958


    So very Spexcellent.

  • Awards Super Saiyan Topic Starstormer Hyperactive Contributor Renowned Hacker

  • View Profile Awards
    « Reply #7 on: February 07, 2012, 04:56:40 PM »


    I'll have to check that file out later. Did you select the head AND the mouth when you averaged? Because that looks like reflective tape, and reflective tape only happens when all the normals on a model are facing the same direction.

    Averaging makes all the differing normals "average" out to the same spot. If they aren't averaging to anything, it looks really bad.
    Logged


    Jocky
    Expert Kitten
    ****
    Offline Offline

    Posts: 55


    Ghosting!

  • Awards Dedicated Hacker Favorite'd Featured

  • View Profile Awards
    « Reply #8 on: February 07, 2012, 05:04:12 PM »


    Tried that, makes the section look off from the rest of the model.
    I don't think I'm getting this at all.
    Logged

    Spex130
    Holy Kitten
    *
    Offline Offline

    Posts: 1958


    So very Spexcellent.

  • Awards Super Saiyan Topic Starstormer Hyperactive Contributor Renowned Hacker

  • View Profile Awards
    « Reply #9 on: February 07, 2012, 08:09:34 PM »


    Hmm. I don't suppose you have a file from before you started this in your Autoback folder, do you?

    If you don't you'll probably have to rotate the Normals manually.
    Logged


    Xiggah
    Supreme Kitten
    ********
    Offline Offline

    Posts: 648

  • Awards Super Saiyan Topic Heart Container

  • View Profile WWW Awards
    « Reply #10 on: February 07, 2012, 08:19:03 PM »


    Great tutorial Spex, I was wondering if there was a quick simple way to do this.
    Logged


    Jocky
    Expert Kitten
    ****
    Offline Offline

    Posts: 55


    Ghosting!

  • Awards Dedicated Hacker Favorite'd Featured

  • View Profile Awards
    « Reply #11 on: February 07, 2012, 08:43:34 PM »


    It was like that since I exported it straight from Brawlbox Spex.
    Or any TL model for that matter.
    So rotating  the Normals is to be taken literally?
    Logged

    Spex130
    Holy Kitten
    *
    Offline Offline

    Posts: 1958


    So very Spexcellent.

  • Awards Super Saiyan Topic Starstormer Hyperactive Contributor Renowned Hacker

  • View Profile Awards
    « Reply #12 on: February 07, 2012, 09:04:12 PM »


    It was like that since I exported it straight from Brawlbox Spex.
    Or any TL model for that matter.
    So rotating  the Normals is to be taken literally?

    I suppose it would be, yes. You'd take the groups and rotate them manually until they look nice. That's going to more a paint than it's worth though.


    Or since it's an official TL model, you can try to reimport the head polygon. That could work too, if you haven't made any changes to it.

    The next time around, though MAKE SURE to choose the Head polygon AND the mouth polygon when you average. It'll work, I guarantee it.

    After all, I just literally opened up 3DS Max not 5 minutes ago, imported TL's DAE, and fixed the mouth normals using the same technique.
    Logged


    Jocky
    Expert Kitten
    ****
    Offline Offline

    Posts: 55


    Ghosting!

  • Awards Dedicated Hacker Favorite'd Featured

  • View Profile Awards
    « Reply #13 on: February 07, 2012, 09:37:58 PM »


    Then I'm definitely doing something wrong.
    I'm still getting "reflector tape".

    1. I re-imported the Head Piece
    2. I added Edit Normals Modifiers to both
    3. Then I averaged and still, the same thing
    Logged

    Spex130
    Holy Kitten
    *
    Offline Offline

    Posts: 1958


    So very Spexcellent.

  • Awards Super Saiyan Topic Starstormer Hyperactive Contributor Renowned Hacker

  • View Profile Awards
    « Reply #14 on: February 07, 2012, 09:42:02 PM »


    Then I'm definitely doing something wrong.
    I'm still getting "reflector tape".

    1. I re-imported the Head Piece
    2. I added Edit Normals Modifiers to both
    3. Then I averaged and still, the same thing

    Hm. That's most certainly very odd. I suppose the only way to figure it out is to look in greater detail...

    What were your exact methods of doing this? There were probably sub-steps you did in between those numbers up there in the quote. Could you tell me them?
    Logged


    Pages:  [1] 2
    Print
    Jump to: